Partner Leads the King
Partner leads the king. What is your plan?
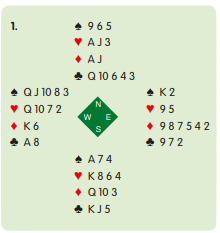
Problem 1
West leads the ♠️Q. What is your plan?
Given the bidding and the ♠️9 in dummy, the lead could well be from Q-J-10-x-x. In this case, your side might make four spade tricks and one other the ♣️A or ♣️K most likely. To keep the spade suit fluid, you should overtake the ♠️Q with the ♠️K. If this wins, continue the suit. If you fail to overtake, declarer can get home by winning the first spade or by holding up twice.
| West | North | East | South |
| 1♠️ | Pass | Pass | 1NT |
| Pass | 3NT | All Pass | |
Problem 2
Partner leads the ❤️K. What is your plan?
From the bidding and lead you place partner with at least five hearts (probably exactly five) headed by the king-queen. Three heart tricks and your two aces will suffice to defeat the contract. The possible problem is that if the ❤️K wins the first trick and the ❤️A the second, partner might be unable to regain the lead. If declarer has the ♣️Q J (or ♣️Q 10 and guesses correctly), the last heart in dummy could go away on a spade. The solution is to overtake the ❤️K with the ❤️A. You do not mind setting up the ❤️J on your left since you can ruff the third round of hearts later.
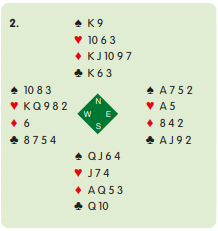
| West | North | East | South |
| 1NT | Pass | Dbl¹ | Pass |
| 2❤️ | All Pass | ||
| ¹ Transfer to hearts | |||
While you might not get a great score for one down because 2❤️ might have made you would rather go plus than minus.
Problem 3
Partner leads the ♦️J. What is your plan?
As on the previous problems, you must decide whether to overtake partner’s lead. This time you have not just one honour in the suit but three a rare treat.
If the lead is from a five-card suit, you want to overtake and cash all your top diamonds in case partner has no entry. If, however, the lead is from three, overtaking will set up a fourth-round winner for declarer. Since it is improbable that South would open 1NT with a low doubleton in two suits, the three-card holding seems more likely you should play low at trick one. On the fourth round of diamonds, watch partner’s discard to decide what to lead next.
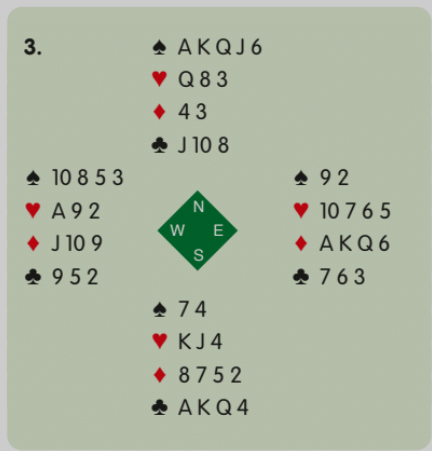
| West | North | East | South |
| Pass | 1NT¹ | Pass | 2♠️² |
| Pass | 3NT | All Pass | |
| ¹ 12–14 ² Transfer to spades | |||
Problem 4
Partner leads the ♠️K. What is your plan?
Your decision is similar to the one in Problem 2 — then it was right to overtake the king with the ace. Can you see the key differences here?
This time your trump holding is such that you will score a natural winner anyway, whereas if you ruff you will not score a trump as well. Another difference is that partner, who made an opening bid, is likely to have an entry and South, who passed 3❤️, is unlikely to hold both top hearts and the ❤️A. Allow the ♠️K to hold and then take the ♠️A later. Partner will make the ♦️A and ♣️Q while you make a trump for the setting trick.
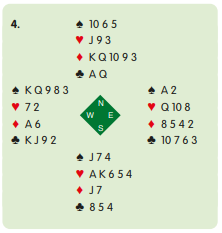
| West | North | East | South |
| 1♠️ | 2♦️ | Pass | 2❤️ |
| Pass | 3❤️ | All Pass | |